Showing posts with label WW1. Show all posts

Thursday, January 6, 2022

Airfix WW1 British Royal Horse Artillery 1:72


Happy New Year !!!

May 2022 be Happy  Creative Productive and above all  HEALTHY for all the world!!
Let's hope that next New Years Eve will find us all here and COVID as a bad dream...

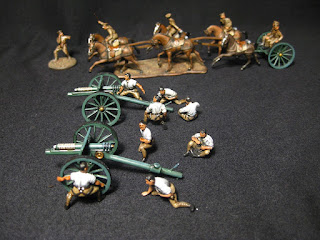
       Taking the opportunity of the last post I would like to present here another Artillery set painted last year. ( No base this time). The classic Airfix set of "WW1 Royal Horse Artillery" .


       This set first released in 1968 and continue to the next decades. But the continuous production wears out the molds so the 80's and 90's sets are a bit scrappy regarding the mold lines and the material.. I had a real difficult time trying to clean these up... But finally did... :)


      I have found an older set and purchased it and the difference is 100% obvious. The material is also better and stronger than this rubbery plastic. Also have to say that all the new releases of these Airfix sets are having the same problems. I have painted British WW1 and French WW1 with excactly the same problems. 

......here are the remains of a day's job...hahaha

A good wash to clean all their sins.... sinking in the bottom of a .. tupper...


      ...and finally the painting stage. Here are some of my references.


    and the final result...I love these horses!! They turned out really good :)


.......and here is where I made the mistake to glue the riders on the right line of horses... 
Later I've been told that the riders always sit on the left line so they can control the right line horses with their right hand... Cleaver...


Another adventure in small scale and sure learned a lot from it. This set was for a commission but I have plans to repaint the set , now that I have the older version, and put it in a small diorama base.

Lesson to learn from this post: Be careful with the Airfix 90's issues. 
They might turn good at the end but...a lot of cleaning is needed :)

'Till next time...

Keep Up The Brushes!!


Saturday, April 17, 2021

WW1 1:72 Diorama Display Base - Step by Step

         It's been almost three months since my last post on my blog...Very busy months but at least I've  manage to keep posting on AHPC for the fist time this year. You will see some of my entries there the forthcoming months.

        For now I will present another challenge I had this time. This is my first official try for a Diorama of this scale. This a WW1 Diorama requested from a client to display his WW1 1:72 figures. 


      The total size is 50X25cm and that's why the trench lines are quite close, but as stated before this is a display base and my task was to try to realistic place the figures on it. Here you can see some German and British Infantry figures and also the classic Airfix British WW1 Artillery set. 

      I tried to take pictures of all the stages but (as always) some got lost in fever of creation......

     The basic material is expanding foam spray and it was used to form the body of the diorama.


     This , then got sculpted and covered in kitchen tiles glue. I found out that this hardens more when dries out  then classic stuko.


            I've also used classic plastic paint in the mix so the painting later will need less hands.


       Then woodwork applied. Not 100% realistic but good for the purpose. Matchsticks have been used for this and proven really good.


       The sand bags are made out of plaster but I missed this procedure.... 
So next, placing sandbags sand and mud and then paint the whole thing in a dark brown tone.


Then spray the whole thing with PVA white glue.


Testing with the figures to see how it looks before the last painting touches..


            Now the body gets glued and then screwed on the wooden base for extra strength.


                                               And here is the final product in some close ups.


                                            ....and some with the soldiers on it.


At the end I've added this wire fence but not 100% happy with it. I should have a thinner wire..


That's all for now... Hope you like it and enjoy the many many pictures :)
I'll be glad if this will be at help for someone out there or an inspiration for a creation! 

Till next time....

Keep Up The Brushes!!